The Chesterfield Sofa: Discovering Its Mysteries

The chesterfield sofa is an iconic piece of furniture, a sofa that many designers who use a classic style in a design layout choose to use. But why? What makes it so interesting?

As defined by Fleming, the Chesterfield is a sofa of classic design with the arms and back at the same height. But even with this rather bland definition, made by the very founder of the original company that mass produced them, all you have to do is look at one of these classic sofas to see its beautiful styling and features.

brown-chesterfield

Distinctive Chesterfields

No one disputes that this sofa is a classic icon of design. If it weren’t, this cozy, tailored and comfy sofa would not be trending today. A sofa that fits well anywhere, and have been used for hundreds for their comfort, style, and classic good looks.

Strangely, the origins of this classic décor item still remain obscure – a mystery we will explore for its interesting value.

The History of the Chesterfield Sofa
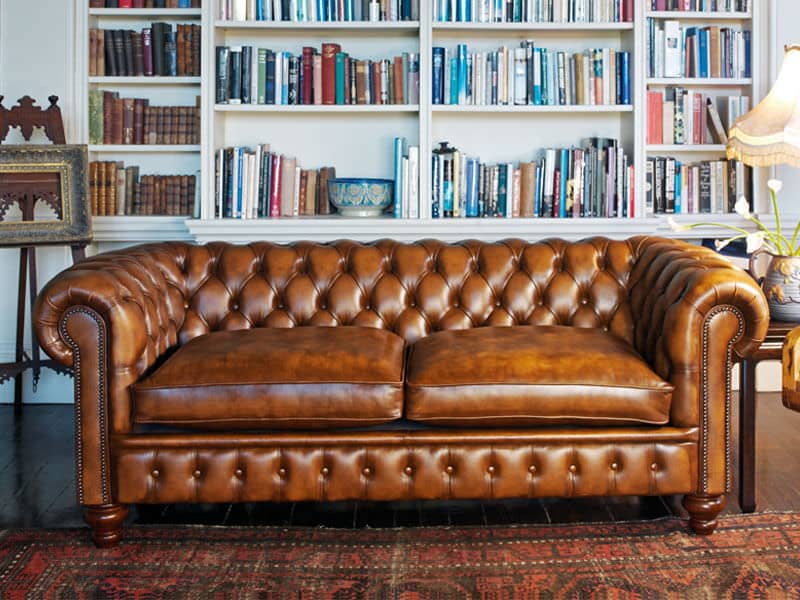
chesterfield-sofa

25 Best Chesterfield Sofas That Are Sure to Really Tie Your Room Together | HomeBNC

Some suggest it was Paul Fleming, a fourth generation furniture maker, who started to mass produce this iconic design. Before this, the deep-buttoned, leather cover sofa was being used, but it was customed designed for the Noble homes of Europe.

Some believe that the name only meant a sofa or even a piece of furniture. But it was finally copyrighted for this sofa by the company Fleming Howland. Unfortunately, there is no proof of this. None of the older pieces have any paperwork that describe the real origins of the sofa. Some say it was a sofa originally designed by the Earl of Chesterfield, hence the name.

In the 18th century, deep buttoned furniture was fashionable, although it was more common in pieces that were made of velvet and not of leather. Apparently, the buttons were an accent used to make the piece uncomfortable, as expensive pieces of furniture were made for the wealthy classes. Men of the upper classes often had people come to their place of business or home and wait to see them. The story goes that the buttons were a way of discouraging people from staying too long.

But as we all now love this classic piece, whatever the origins, Chesterfield sofas symbolizes a certain style. It is not just a piece of furniture but a piece of history. It is a classic leather sofa that has brought many a room a distinguished charm and elegance over the years. All of the subsequent designs and models (settees, sofas, rocking chairs, window seats, arm chairs, etc,) that have been fashioned in the last 200 years have been inspired by the one and only Chesterfield.

Make Easter Memories With Easter Crafts For Kids

Easter is just around the corner, and it’s the perfect time for us to spend time with our toddlers by making easter crafts. Easter is all about rebirth and the joy of spring, and few activities combine tradition, learning and Easter fun like making crafts for Easter Sunday. Crafts are an enjoyable learning tool for our little ones. They increase children’s’ creativity and concentration while giving parents a chance to enjoy the company of their children. With a few simple Easter craft projects, we can make this Easter a happy memory for our children.

The egg-carton Easter bunny

http://www.sassydealz.com/wp-content/uploads/2014/03/egg-carton-bunny-craft.png.

This year, let’s use egg cartons to combine the concept of eggs and the Easter bunny to create Easter bunnies from egg cartons. Making the bunny is a simple process. First, we need an egg carton, preferably one with large egg cups. We also need scissors, glue, a black sharpie, white paint and pink paint.

We start by cutting out an egg cup. Its edges should be trimmed to make them smooth. We then cut out the bunny’s ears from the carton. With a sharpie, we draw the bunny’s eyes nose and mouth onto the egg cup. We use pink paint to paint the nose and white paint to paint the ears. After the ears are dry, we glue them onto the back of the bunny’s head, and we’re done. It’s that simple.

via sassydealz.com

A tree made of Easter eggs

With a few Easter ornaments, we can make colorful, tree-shaped Easter crafts . All we need is some Easter eggs, Easter grass, a foam cone and some glue. Starting at the base and working our way to the tip, we glue the Easter eggs onto the cone. We wait for the glue to dry before filling the gaps on the cone with Easter grass, which we also attach with glue. The process is quite simple, with the hardest part being watching the kids. Here’s an image of what the completed work should look like.

Easter Egg Craft

via cutediyprojects.com

Make a hatching egg with paper and a popsicle stick

chick-egg

We can make this Easter special with eggs that actually hatch. The child will really enjoy making this craft that also serves as a toy. For this project, we need construction paper of many colors, feathers, googly eyes, a popsicle stick, scissors and glue. First we cut out an eggshell from white construction paper. Then we cut out a chick from yellow construction paper. We then cut some of the colored paper into strips of varying shapes. To decorate the eggshell, we glue the colored strips of paper onto it.

We glue eyes, feathers and a beak onto the chick’s face and attach a popsicle stick to the chick’s lower end. Finally, we attach the eggshell to the popsicle stick in such a way that the chick seems to be hatching from the egg.

An Easter bunny with your child’s face

easter-crafts

Both parent and child will love this adorable Easter craft. To make this keepsake, you need an 8-inch tall portrait of your little one. The face should have a half-inch of space all sides. You also need two sets of the child’s footprints. You can dip the toddler’s feet in child-friendly paint and have him/her step on a sheet of paper. When the prints dry, cut out two pairs of feet. You will also need cotton balls, white card paper and glue.

Cut out a big oval from white construction paper. This will form the bunny’s belly. Stick cotton balls all over the oval. Glue the photo onto one end of the belly and attach cotton balls all around the face. Glue one pair of feet to the bunny’s head. The feet act as bunny ears. You can glue cotton onto the “ears” if you like. Glue another pair of feet to the lower end of the bunny. Now your bunny has feet.

This bunny can be glued onto a sturdy frame and can be sent as a card or framed as artwork in the home.

via cutediyprojects.com

Easter is more memorable with crafts

Easter crafts are a good opportunity to bond with our children. Few other activities combine learning and bonding during Easter like creating Easter crafts.

The work of a tattoo artist

Tattoos have existed amidst humans since a long time. While it was then used to mark humans and delineate authority, achievements and various other concepts, tattoos have today become mainstream and increasingly popular, regulated and creative in concept.

Tattoo artists are those who design and apply tattoos to their customers. They have to ensure they maintain a safe and clean environment and protect against the spread of infectious diseases. They not only have to keep the work area clean, but also keep on devising new designs in their spare time. They have to keep abreast of the latest tattoo designs and meet their clients to discuss their desires. They also have to keep up to date with the latest in health and safety procedures.

Skills and expertise

Tattoo artists have to be knowledgeable in art and the body so that the tattoo is safely applied while following health regulations and meeting their customers’ expectations. They don’t need a college degree to apply tattoos, but do need a state license.

Some may take art courses in school or community colleges to learn how to design and create better tattoo ideas. It goes without saying that tattoo artists not only need to have a love for attractive colors and a flair for design and creativity, but also have a steady hand with lots of patience and dedication.

Apprenticeship is a must

They should preferably start in an apprenticeship spanning at least three years wherein they learn the trade of not only designing tattoos, but also operating the tattoo machine and the right sterilization methods. Free apprenticeships are however rare; apprentices need to pay the experienced artist for teaching their trade.

Tattoo artist trainees also have to buy their own equipment and sterilizing kit while working as an apprenticeship, and not expect to be paid for the apprenticeship. They will have to work for about 6 hours a day for 6 days a week and will be handed more responsibilities as they progress, till they can apply a simple tattoo unsupervised.

It’s thus better to have a contract stating the terms of their apprenticeship. They will move on to creating complex tattoos as their experience grows. Generally, a tattoo artist is termed fully qualified only after gaining experience after working full time for 5 years.

Requirements to become a tattoo artist

Once tattoo artists have sufficient experience to practice alone, they need to get a license which has varying requirements in different states. They generally have to complete a fixed number of training hours and a fixed number of applied tattoos. Some states require that the artist be at least 18 years old and others that the artist should be abreast of laws through continuing education courses.

Tattoo artists should also have an artistic ability, manual dexterity, creativity, customer service skills and have some knowledge of tattoos and tattooing. It’s also better if they have tattoos as if they plan to give others tattoos, its better if they first display their own tattoos! Remember people planning to have tattoos have questions, and the tattoo artist should be able to answer these questions through personal experience, and thus put all fears of tattooing at bay.

How To Effectively Manage Your Time For Optimum Productivity

If it is one thing that successful businessmen do not have, it is enough time in the day. They have a million ideas in their head about existing business, their next venture and a bunch of things that they need to accomplish. Here are practical and actionable tips that businessmen can use to increase their productivity and manage their time. These are 1. Organization
2. Attitude
3. Delegation
4. Information Management
5. Productive Systems

1. Organization

Organization and proper time management go hand in hand. The first step in achieving the right productivity improvement plan involves getting organized. To get organized is the first step that businessmen should learn to perfect the art of being more productive. Organization entails the self-awareness and becoming more conscious of how you spend your time. You should create an activity log that will depict if you rely on multitasking. Self-awareness makes one more productive by evaluating their work preference patterns and schedules in order to evaluate the priority tasks.

2. Attitude

After getting organized, the next step in improving productivity involve your attitude and approach to tackling your work. Self-motivation plays a critical role in determining how productive you can be. You should learn all the factors that motivate you to work on your level best. Create the best environment possible away from all forms of distractions that is geared towards achieving your ultimate best performance. Take the appropriate skills to control your time and schedule while at the same time reducing work stress. The mindset with which you approach your work is fundamentally essential to increasing your productivity and improvement of your overall time of management.

3. Delegation

The act of being more successful is not a lone sport as you have to delegate. It is not advisable to accomplish tasks that can easily be assigned to others or contracted to someone else. If there is someone else who is skilled enough to do a task, it is a good practice to delegate as this will create an extra time for you to do so other productive tasks. Provide sufficient support and resources to others and micromanage them to maximum on your time.

4. Information Integration

Identification and mastery of how best to use information enable businessmen to increase their productivity. You should understand how to manage information on your trade magazines, emails, memos, status reports, financial results and operational statistics. The way you utilize the information, comments, feedback and resources found on these means of communication act as a determinant of your overall production and success. Read various sources of information in details and extract any resourceful information that will aid in making you more productive.

5. Productive Systems

Finally, to achieve the optimum success, focus on raising your game in relation to your performance and the production of your team. Making improvements in the organizational systems enables you accomplish more helping your organization effectively leverage assets facilitating achievement of objectives successfully. Job analysis, practices like the Kaizan and renowned techniques such as the Kanban will assist you to react maximum levels of productivity.

productivity

This piece of business content on achieving productivity was written based on the research from the following sources.

1. http://www.briantracy.com/blog/time-management/6-time-management-tips-to-increase-productivity-organizational-skills/

2. http://www.businessinsider.com/how-productive-ceos-manage-their-time-2012-10?op=1

3. http://www.bakadesuyo.com/2014/09/manage-their-time/

4. http://www.referenceforbusiness.com/management/Str-Ti/Time-Management.html

5. http://smallbusiness.chron.com/ways-improve-company-productivity-1230.html